
Type Monkey 3d Text for after effects from ae scripts


Introducing TypeMonkey+, a new add-on that makes use of AE2024+’s Advanced 3D Renderer. Never before has kinetic typography been so simple, quick, and multidimensional.


A simple, customizable typing test platform is called Monkeytype. It has multiple test settings, an account system for storing typing speed data, and customizable options including themes, soundtracks, and a silky touchpad. Numerous typing modes, including Time, Words, Quote, Zen, and Custom, are available for selection. Furthermore, Monkeytype offers practice choices for delayed words, missing words, and certain words. There are troubleshooting procedures you can use to fix any problems you have with the website1.
Regarding TypeMonkey3D, it is an After Effects script designed to make use of the newly released Advanced 3D Renderer in AE2024. TypeMonkey3D rapidly turns your TypeMonkey build to 3D with a single click. You can make your own textures and lighting environments, or you can use pre-made ones2.


Depth details about monkey 3d
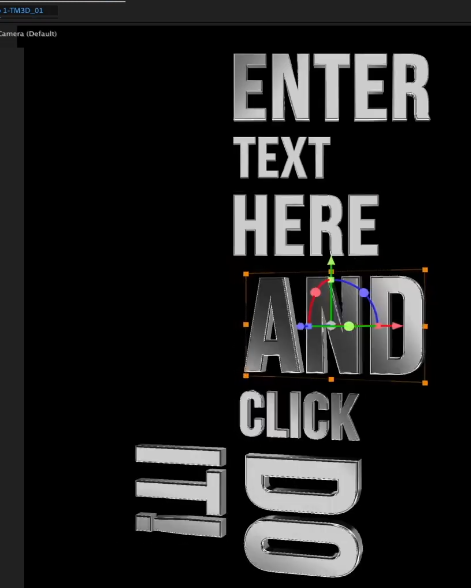
welcome to the first tip monkey 3D tutorial tip monkey 3D is a new add-on for the original tip monkey that converts the normal build to 3D you’ll need the original tip monkey to use it it’s not a standalone script if you already own TI monkey make sure to download the latest copy we’ve optimized it for use with tip monkey 3D this tutorial won’t go over how to use tip monkey if you haven’t used it before head over to the product page on a scripts and check out the tutorials there ever since we’ve launched type monkey we wanted to create a 3D version but it just wasn’t practical with the ray trace or the c4d renderers now with the introduction of the advanced 3D renderer in a2024 we could finally make that happen let’s go over the basics and then we’ll do a deeper dive and show you what’s happening under the hood first you have to create a typ monkey build typ monkey uses the classic 3D renderer if you’ve got a different renderer active it It’ll ask to switch it over for you automatically once that’s done you’re ready for typ monkey 3D you could either click the 3D button to launch the new script or launch it from the windows menu if you launch it from the button you won’t be able to dock it if you want to do that just launch it from the windows menu once you have that set pick an HDR to light the scene we’ll just use the default one for now and and click 3D it in a few seconds you’ll have a 3D type monkey build ready to go the first time you build It’ll ask you to manually source for the environment light this will only happen on your initial build once you do that the first time if you end up changing hdrs it’ll do that automatically if you don’t do that after effects will use its default HDR as a light source and once the build is done you can mess around with the camera the materials the geometry lighting and the environment map what happened was the original comp was duplicated the renderer was changed to Advanced 3D and all the UI settings were applied to all the text layers a bunch of effects controls were created and applied to the master control layer and if you unshy the comp placeholders for each of the text layers were generated these will only come into play if you want a texture applied to the face of the text to do that you can select one of the images we’ve supplied in the image map drop down or you can use your own custom image and click add image the image comp also has effects controllers that relate specifically to the transformations of the image map the UI mainly controls the 3D text features available in the current version of the advanced 3D renderer we built in a bunch of presets including preset looks that control the geometry and the material settings as well as color and opacity presets references for these settings and links to more in-depth information on the advanced 3D renderer will be in the FAQs the environment section this section of the UI is a series of preset hdrs that have a huge effect on any text layer that has either specular or metal settings greater than zero you can also import your own hdrs it’s very easy to change after building by selecting a new one and clicking update we have a button here called animate rotation this will apply a constant drift to the rotation of the environment map this will keep the refle C moving you can adjust the speed after the build using the environment map effects controls this last checkbox add y rotation is a bit different from the rest of the UI settings this is the only button that will affect the original layout of typ monkey it adds a y rotation every fourth or fifth word we put image mapping in a section environment update feature it’s the only part of the UI that needs to have an when you click add image it’ll run through a process that creates a fill in classic 3D and a mat in advanced 3D remember those placeholders well in the by image maps and then parent it to the text which is then used as a track mat the mat is created by duplicating the original 3D comp and changing the bevel side and back t
Tutorial video
 Click Here Get it from G drive link

